
Friday, January 27, 2012
Another Month Down...
Well, I finally got everything in the freezer, and here's the final look before I pack in the cooking for this month. If you decide to do this, get used to your refrigerator looking empty all the time....mine's only full 2-3 days a month, max :) Have a good one!

Thursday, January 26, 2012
Homemade Pita Bread...
I figured as long as I had all the ingredients for this recipe, I'd give it a go. It tastes right. I think I rolled the dough too thick or didn't knead quite enough or let it rise too long or something though (I did sort of lose track of time, since I was cleaning and doing errands in between), because they came out way too thick. Either that, or I misinterpreted the explanation/photos on Under the High Chair where I found this recipe. I got the impression they were light and hollow. Either way, they taste really good with the hummus...I just need to cut them all in half to get them to an appropriate thickness...otherwise I feel like I've got a giant piece of crusty bread that I should be putting butter on or something. Next time I'll roll them out thinner and knead more and see what happens :) Here's the recipe:
Homemade Pita Bread
Ingredients:


Homemade Pita Bread
Ingredients:

- 1 T. yeast
- 1 1/4 c. warm water
- 1 tsp. salt
- 3-3 1/2 c. flour
Directions:
Put the yeast and water in a bowl, and let yeast sit and dissolve in for about 5 minutes. Add salt and 1 1/2 c. flour, and mix with the dough hook of an electric mixer. Keep adding flour until it forms a solid mass that's not too sticky. Knead for about 8 minutes until dough is smooth and elastic. Add more flour if it's too sticky to work with. Put dough on a floured surface, cut into 6-10 pieces depending on the size of pita you want. Form each piece into a ball, and then use a rolling pin to roll it out to about 1/4 inch. Let rest on floured surface for 30-40 minutes.

Flip upside down onto baking sheet, and bake 10-15 minutes.

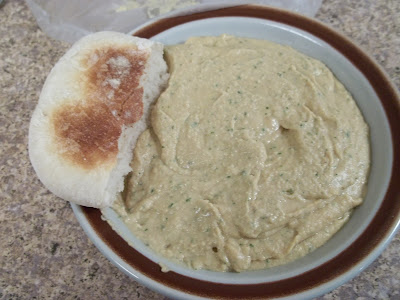
As I said earlier, I'm having mine with the hummus I made :)

Homemade Hummus...
I thought I hated hummus for a long time. As it turns out, I just hate grocery store hummus. My sister and I went to this lovely little coffee shop in Milwaukee, WI, called Brewed one day and ordered hummus, and oh.my.god. It was amazing. Warm and delicious and sort of nutty with fresh, hot little pita points. (Additionally, if you're ever in the Milwaukee area, they also have delicious coffee, pastries, tuna sandwiches, and a bunch of vegan stuff if you're into that). Anyway, I loved it. But I didn't really know what was in it or how to make it...and I didn't have a food processor anyway. Enter Christmas 2011...and I got a food processor for Christmas! (You know you're getting old when you're legitimately excited about getting kitchen appliances for Christmas). Anyway, I went to the Food Network website and got Alton Brown's recipes for hummus. I figure if anyway knows the proper way to make hummus, it's Alton Brown. So anyway, there's a traditional version, and there's a "turbo" version that's quicker and easier to make. Since it's my first hummus-making experiment, and I was already a little overwhelmed at the whole prospect, I went with the Turbo Hummus. Plus, it's cheaper, since it uses peanut butter instead of tahini...an idea that I liked in case the whole process went terribly awry, I wouldn't have a bunch of tahini sitting around with nothing to do. So I got it all done, and it's good...it's not Brewed good by any stretch, and you do get a little bit of that peanut butter flavor, but it's pretty tasty. MUCH better than the grocery store version, and every bit the right texture, which is, as it turns out, half the battle with the hummus that I've tried. Anyway, here's the recipe:
Turbo Hummus
Ingredients:

- 2-3 cloves garlic
- 1 can chickpeas (garbanzo beans), drained and liquid reserved
- 2-3 T smooth peanut butter
- 1 handful fresh parsley leaves
- 1 lemon, juiced and zested
- Pinch of pepper
- Pinch of salt
- 1/3 c. olive oil
Directions:
Chop the garlic in the food processor. Add beans and 1/2 of the reserved liquid and process to the consistency of your preference. Add the peanut butter, parsley, lemon zest and juice, salt & pepper. Process until it forms a paste. Drizzle in the olive oil and process until it reaches the consistency of mayonnaise.

I'm serving mine with homemade pita bread too, which will be the next (and final, for this month) recipe.

Baked Oatmeal with Fruit...
I was so anti-oatmeal for the longest time. I think it was from years of glue-y textured microwaved packets of oatmeal. But when McDonalds (yes, McDonalds, I know how bad that sounds) started serving oatmeal last year, I found that with all of that fruit in there, I really like it again. So I've been seeing oatmeal recipes popping up on Pinterest, and I settled on this one from Annie's Eats for round one. I'm interested in trying a Steel Cut Oats recipe next time, but for this time I settled on rolled oats (impatient this week...remember? Steel Cut takes longer to cook). The calorie counts I'm using are from the original recipe...I changed the fruits I was using, so I'm sure they're a little different, but at least it gives you a general idea. It turned out really tasty, and I think it'd be good for breakfast or for dessert with a little ice cream (yum!). I used strawberries and blackberries this time, but next time I'm thinking maybe apples and cranberries...or peaches and blackberries maybe. Mmmm...so it's pretty versatile...and fresh or frozen fruit works fine. I used frozen because it was a little cheaper this time of year for what I wanted. So here's the recipe:
Baked Oatmeal with Fruit
8 Servings, 211 Calories Each

- 1 c. old fashioned rolled oats
- 1/4 c. chopped pecans, toasted (I forgot to toast mine and it was still really good, but it'd probably be even better toasted...I'll remember next time!)
- 1/2 tsp. baking powder
- 3/4 tsp. cinnamon
- Pinch of salt
- 1/4 c. maple syrup
- 1 c. milk
- 1 egg
- 2 T margarine, melted
- 1 tsp. vanilla
- 1 1/2 c. strawberries
- 1 c. blackberries
Directions:
Mix oats, half the nuts, baking powder, cinnamon, and salt together in a medium bowl. In a separate bowl, whisk together syrup, milk, egg, margarine, and vanilla. Grease a 9"x13" casserole dish, and put the strawberries in a layer on the bottom of the casserole. Put half of the blackberries on top. Pour dry ingredients evenly over the fruit. Pour wet ingredients evenly over dry ingredients. Add the rest of the blackberries and nuts on top.

Bake at 375 degrees for 35-40 minutes until browned and oatmeal is set. Looks yummy!

I would probably serve it with a little honey on top for breakfast. Or a little whipped cream or ice cream if you're going for dessert :)

Chicken Caesar Sandwiches...
I love chicken caesar salads. However, the problem with salads when you're cooking for a month at a time, is that romaine lettuce lasts for MAYBE a week, if you're lucky. So when I saw this recipe on The Girl Who Ate Everything it intrigued me. First off, it's intended to be served hot, which is new. And also, it was originally intended to be a slow cooker meal. I was feeling majorly impatient this week, so I adapted it to be done on the stovetop instead of the crock pot, but if you're not in a time crunch, feel free to check out the original recipe at the link above to see how that changes cooking times, etc. The original also calls for dark meat, but I'm not a dark meat girl, so I used white...whichever you want is fine :) I went ahead and had a sandwich for lunch when I was done cooking it, because I hadn't had a chance to eat yet, and it was delicious. I had it hot, but I'm sure it would be delicious cold too. And putting a nice crisp piece of lettuce on top (for as long as you have crisp lettuce, anyway), would top it off great too. Also, I had a brief memory lapse and forgot I was supposed to be taking pictures, so there's only two for this one...sorry! Without further ado, here's the recipe:
Chicken Caesar Sandwiches
6 Servings, 321 Calories Each
Ingredients:


Chicken Caesar Sandwiches
6 Servings, 321 Calories Each
Ingredients:

- 3-4 chicken breasts
- 1/2 c. shredded parmesan
- 1/4 c. chopped parsley
- 1 c. Caesar dresing (I used Ken's Steakhouse Lite Creamy Caesar. My absolute favorite is Ken's Steakhouse Lite Caesar (not creamy)...but I thought the chicken may get dry in the reheating if I didn't switch to the creamy.)
- Pepper, to taste
- Buns
Directions:
I boiled my chicken breasts in salted water. You could do them in a skillet if you wanted, but I think they stay a little more moist when you boil them, plus, I've found they're a little easier to shred when you're done. Once chicken is done, set aside to cool, and empty pot of water. Shred chicken with a fork and put back into pot. Add parmesan, parsley, Caesar dressing, and pepper, and mix. Turn heat on low till everything is warm and parmesan is starting to melt. Serve hot or cold.
I'm having mine with an little Cutie's orange for a total of about 400 calories. Oh, and a tip on the buns, if you keep them in the refrigerator on a wire rack, they'll last easily 3 weeks without getting stale.

Cheesy Quinoa Casserole...
I'd never had quinoa before, but thanks to a pile of delicious looking pictures on Pinterest, I decided to try it this month. Apparently quinoa is some sort of wonder grain that's supposed to be really good for you. The part that appeals to me is that it's a "complete" grain, which basically means it has plenty of protein and makes you feel full for longer than, say, white rice (helllooooooo Chinese food...maybe I should have quinoa with that instead of rice...perhaps I wouldn't be ready to eat another meal an hour after dinner!). If you read my menu plan, you'll notice that it was not called Cheesy Quinoa Casserole on the original list. The original recipe on Monica Nelson Fitness is called Quinoa Mac and Cheese. Upon making it though, I think it's definitely more of a casserole than it is a mac and cheese. It's one of those diet problems, I think...ever had that problem? You've been eating 100 calorie pack brownies for the last 2 years, and you're finally so far removed from real brownies, that you're sure that's how real brownies really taste? And then you recommend them to someone who DOES know what real brownies taste like, and tell them they're practically the same thing, and they look at you like you've lost your mind? (Ahem...not that that's ever happened to me). So yeah...definitely NOT mac and cheese, but still a yummy casserole. I think next time I would add some mushrooms and red peppers to take it even further in the casserole direction. Based on the texture, I'm pretty sure it'll reheat well, but I'll update if there's any issues. Here's the recipe I made (adjusted a little from the original):
Cheesy Quinoa Casserole
8 servings, 250 Calories Per Serving
Ingredients:

- 2 tsp. Olive Oil
- 1 c. Green Onion, Diced
- 1 Green Pepper, Diced
- 1 1/2 c. Quinoa, Rinsed and Drained
- Pinch of Salt
- 1 c. 2% Milk
- 2 Eggs
- 2 Cloves Garlic, Minced
- 1 1/2 c. Shredded Cheddar
- Pepper, to taste
- Crushed Red Pepper Flakes, to taste
Directions:
Heat oil over med/med-high heat in medium-large skillet. Add green peppers and green onions and cook 4-5 minutes till tender. Add garlic and quinoa, and cook 3-4 minutes until quinoa starts to become translucent (quinoa is NOT done yet, so don't worry about it looking a little like uncooked rice). Add 3 c. water, and season with salt and pepper. Cover, turn down heat to med/med-low for 10-15 minutes until most of the liquid has been absorbed. Remove from heat and let sit 5 minutes.

In a separate large bowl, whisk together eggs, milk, and crushed red pepper. Fold in quinoa mixture and cheese. Transfer to greased 9"x13" pan.
Bake at 350 degrees, uncovered, for 30-35 minutes, until the edges start to brown.

It was easily 8 servings, although the recipe said 6-8...I think you'd probably burst if you only made it into 6 servings. I'll be having mine with a crescent roll for a total of 350 calories per serving.

Corn Dog Muffins...
Yep, corn dog muffins. Sounds a little trashy, doesn't it? But then you think about it a little and think...corn dogs are yummy...and a pain in the butt to make...and way too terrible for you when you get them from the fair! So THIS recipe, from The Family Kitchen keeps the yum-factor, but gets rid of all that mess and bad-for-you-ness. Perfect.
Corn Dog Muffins
12 Servings, 220 Calories Each
Ingredients:


Corn Dog Muffins
12 Servings, 220 Calories Each
Ingredients:

- 2 Boxes Jiffy Corn Muffin Mix
- 4 Hot Dogs
- 2 Eggs
- 2/3 c. Milk
- Handful of Shredded Cheddar
Directions:
Mix muffin mix, eggs, milk, and cheese together in a bowl. Grease muffin tin with cooking spray. Portion out muffin mix into tin. Chop hot dogs into bite-sized piece and push a few into each muffin.

Bake at 400 degrees for 15-20 minutes. Let cool and remove from muffin tin.

I'm going to have mine with Wheat Thins (15 are in a serving) and a wedge of Happy Cow Cheese, for a total of 395 calories. And that's all for this one :)

Petite Lasagnas...
I love lasagna...pasta in general, really. But my recipe is...shall we say...not figure-friendly. So when I found this recipe on Can You Stay for Dinner, in individually portioned muffin cups no less, I was thrilled. They were easy to make, although I think maybe I didn't grease the tin quite enough, because I had some issues getting them out. I did change a few things from the original recipe, based on what I had on hand. Here's the recipe:
Petite Lasagnas
12 Servings, 181 Calories Each
Ingredients:


Let cool before removing from pan. I'm adding a piece of garlic bread to complete my meal, for a total of 334 calories. And that's all for this one :)

Petite Lasagnas
12 Servings, 181 Calories Each
Ingredients:

- 12 oz. ground turkey
- 1 onion, chopped
- 1/2 c. mushrooms, chopped
- 14.5 oz. can of crushed tomatoes (or tomato sauce, if you want to)
- 2 cloves garlic, minced
- 1 1/2 c. part skim ricotta
- 1 1/2 c. shredded mozzarella
- 24 small square wonton wrappers
- Salt, to taste
- Pepper, to taste
- Italian Seasoning, to taste
Directions:
Put ground turkey, onions, mushroom, salt and pepper into a skillet, and cook over medium until turkey is browned. Add garlic, crushed tomatoes, and Italian seasoning to skillet. Reduce heat to low and simmer for 10-15 minutes. In a separate bowl, mix ricotta, salt, pepper, and oregano and set aside. Spray muffin tin with cooking spray liberally. Place a wonton wrapper in each muffin cup, pressing down on the bottom and up the sides. Put a layer of ricotta, followed by a layer of the meat mixture, and a layer of mozzarella. Place a wonton wrapper on top of mozzarella, and repeat layers.

Bake at 375 degrees for 10-15 minutes, until cheese is melted.


Potatoes ala Boulangere...
Well, I needed something to go with my meatloaf...and I AM awfully Irish, so I'll take potatoes whenever I can get them. I originally found this recipe at Kayotic Kitchen, here. I changed a couple of things, mostly because I take shortcuts cooking whenever possible. If there's a way to do it faster or easier, I'm there :) So here goes:
Potatoes ala Boulangere
8 Servings, 117 Calories each
Ingredients:

- 4-5 Russet Potatoes
- 2 Onions
- 1/3 c. Vegetable Broth
- 1/3 c. Milk
- 2 T. Margarine
- Salt
- Pepper
- Garlic Flakes
Directions:
Thinly slice potatoes and onions. (In the original recipe, it called for the potatoes to be peeled, and then the peeled slices to be rinsed and dried, but I don't have time for all that, and I don't mind the peels on the potatoes). Grease a 13x9 casserole dish. Put down a layer of potatoes, then season with salt, pepper, and garlic flake. Repeat with slices of onions. Repeat both layers. In a separate bowl, heat the vegetable broth in the microwave for about 45 seconds. Add milk and mix. Pour milk/broth mixture over pototes/onions. Cut margarine into small pieces and place on top of potatoes/onions.

Cover with foil and bake 40 minutes at 350 degrees. Remove foil and bake for an additional 40 minutes.

As I said in my last post, I'm putting these with meatloaf, for a total of 367 calories per serving. Enjoy!

Meatloaf...
Okay, I know not everybody is a meatloaf person, and to be honest, I didn't used to be either. Most of the ones I'd had were dry and bland. But one day, I was making a meatloaf from the package directions, and apparently misread a couple of things and put in the wrong amount of a couple of things, and voila!, meatloaf that I actually liked. Here's the recipe...
Meatloaf
8 Servings, 250 calories each
Ingredients:

- 1 lb. ground beef (I use as lean as I can...you're putting in a lot of extra moisture, so it doesn't get dry)
- 1 package meatloaf seasoning mix (I use McCormick when I can, but it doesn't really matter. It seems to be getting harder to find meatloaf seasoning in the suburbs, so I've found that pot roast seasoning works too!)
- 2 eggs
- 1/2 small can of tomato sauce (I usually get the garlic, basil & oregano seasoned variety)
- 1/2 cup of milk
- 4-5 slices of bread, ripped into small-ish pieces (I use white, but again, it doesn't really matter)
- Ketchup, to taste
Directions:
Put everything except the ketchup into a mixing bowl. Now as much as I loathe getting my hands messy, it's really the best way to mix everything up, so get ahead and get in there and mix!

Shape into a loaf in a casserole dish or cake pan. Squeeze ketchup on top to taste.

Bake at 350 degrees for about an hour.

I'm making it this month with Potatoes ala Boulangere (the next recipe I'll post), for a total of 367 calories per serving. And that's all for this one :)

Meatloaf
8 Servings, 250 calories each
Ingredients:

- 1 package meatloaf seasoning mix (I use McCormick when I can, but it doesn't really matter. It seems to be getting harder to find meatloaf seasoning in the suburbs, so I've found that pot roast seasoning works too!)
- 2 eggs
- 1/2 small can of tomato sauce (I usually get the garlic, basil & oregano seasoned variety)
- 1/2 cup of milk
- 4-5 slices of bread, ripped into small-ish pieces (I use white, but again, it doesn't really matter)
- Ketchup, to taste
Directions:
Put everything except the ketchup into a mixing bowl. Now as much as I loathe getting my hands messy, it's really the best way to mix everything up, so get ahead and get in there and mix!

Shape into a loaf in a casserole dish or cake pan. Squeeze ketchup on top to taste.

Bake at 350 degrees for about an hour.

I'm making it this month with Potatoes ala Boulangere (the next recipe I'll post), for a total of 367 calories per serving. And that's all for this one :)

Wednesday, January 25, 2012
February Menu Plan...
Alrighty, here's my February meal plan (Items I haven't made before are marked with **):
Entrees
Quinoa Mac & Cheese** + Crescent Roll -
- 6 to 8 servings. Approximately 434 calories each for 6, 350 calories each for 8.
Meatloaf + Potatoes ala Boulangere** -
- 8 servings. Approximately 367 calories each.
Petite Lasagnas** + Garlic Bread -
- 12 servings. Approximately 334 calories each.
Chicken Caesar Sandwiches** + Cuties Orange -
- 6 servings. Approximately 400 calories each.
Corn Dog Muffins** + 15 Wheat Thins & 1 Laughing Cow Cheese Wedge
- 12 servings. Approximately 395 calories each.
Breakfast
Baked Oatmeal with Fruit**
- 8 servings. Approximately 211 calories each.
Cranberry Orange Muffins + Blueberry Muffins (Just add water varieties)
- 12 servings (one of each muffin per serving). Approximately 280 calories each.
Snacks
Hummus with Pita Bread
- Haven't gotten around to figuring out calories or serving size, but I'm sure it's not good.
15 Wheat Thins + 1 Laughing Cow Cheese Wedge
- Approximately 175 calories per serving.
Cuties Orange
- Approximately 45 calories.
Dessert
Mini Ice Cream Sandwich
- Approximately 100 calories each.
Other Things I Have on Hand
- Chop Suey with Rice
- Frozen Pizza
- Brats to Grill
A Change in Direction...
Well, I've been busy, and I've obviously not kept up on my blog. But I was thinking today, I think I'm going to expand the scope of my blog, and include my monthly cooking escapades. It would be nice to have a record of it for myself (I've noticed sometimes I make the same thing for months in a row, and wonder why I'm getting tired of it...whoops!). Plus, there've been a few people who have taken an interest in how to take on a month's worth of food at a time, and it would be nice to share some of that info too (it's not really as overwhelming as it sounds).
For a little over a year, I've been grocery shopping and cooking once a month...a whole month of food ready to go in single serve portions in the freezer, to be heated up later at my convenience. When I used to live with roommates and whatnot, I enjoyed cooking for everyone pretty regularly...now that I live by myself, it's kind of a pain, and it's soooooo easy to just get some take-out instead. So this whole adventure has helped improve my eating habits, free up time in my everyday life, AND is saving me a ton of money every month.
Some tips to get started:
1) This is ALL about meal planning. I plan 5-6 meals, a couple of breakfast items, a couple of snacks, and then I usually have 2-3 random things around the house to make in case I don't feel like eating one of my freezer meals or if I have someone over to visit and want to make something fresh.
2) Make a comprehensive list for the grocery store and STICK TO IT. This was by far the biggest thing for me to overcome. I ALWAYS just picked up whatever looked good in addition to my list when I used to grocery shop. When I first started doing this, I started by limiting myself to five items that weren't on the list. Anymore, I hardly ever grab anything that's not on the list, unless maybe there is some really good fruit on sale or something. This has gotten my grocery bill (and I mean EVERYTHING...paper towels, detergent, etc...not just food) down to $200-250 a month.
3) You have to think about how things are going to freeze and reheat. Let's face it...not everything freezes well...texture can suffer. Things that are heavily cream-based separate, just a solid piece of meat that's not IN something will tend to get dry when you reheat it, things that are supposed to crunch may not upon reheating, etc. Just be conscious of it. A lot of things will reheat better in the oven, but I'm single and busy....and lazy...so I usually microwave everything :) You just have to try it see what works for you.
4) Do yourself a favor and get a really good knife. As a girl who grew up chopping vegetables with a steak knife and not knowing there was a better way....I can honestly say that I used to avoid making dishes that required any real amount of chopping and dicing. That is, until I got myself a really good knife...and the sky opened up, and light shined down, and angels sang...yada, yada....it was amazing. lol :) It makes everything easier and faster...and if you're cooking a month's worth of meals in one day, easier and faster is key.
5) Whenever possible, try to plan meals that aren't all done in the oven or all on the stovetop, etc. That way, you can multi-task and work on multiple dishes at one time. And if you do have to wait to put the next item in, make sure you prep as much as you can while you're waiting. My best time ever for cranking out all of my meals was about 4 1/2 hours...I'm usually pretty comfortable and not feeling like I'm about to spin out of control at about 6 hours though.
6) Wash and re-use whatever dishes you can as you go. I learned this the hard way the first time I did this...I had like 3 dishwasher loads by the time I was finished. If you wash and re-use as you go, it can easily be down to one load (waaaaay better).
7) Just keep going! The first time you do this, it'll feel like you'll be cooking till the end of time before it all gets done. But I PROMISE, when you get to eat a home-cooked meal for lunch at work, and when you get home after work and don't have to cook...every day for like a MONTH...it'll seem like nothing.
8) Know your freezer. There's a few things about the freezer that are important...1) Know how much you can legitimately put in there. I put everything in little gladware containers, because it's easier to just throw in my bag and take to work with me, but if you have limited freezer space, you can save a lot of room putting things in ziploc bags instead. It just takes a little extra consideration when you get to reheating time. 2) You can't put everything in the freezer all at once...it'll drop the temperature too fast, and you'll have unsafe food by the time it actually all freezes. You'll have to put in small batches every 6-8 hours to keep everything safe and freezing evenly. (Sidebar: Don't put anything in the freezer hot...make sure it's all cooled in the refrigerator prior to putting the the freezer).
And I think that's all the info necessary to get started. I think I'll post all the recipes separately so they're easier for me (or anyone else) to search for and find later. Enjoy!
Subscribe to:
Posts (Atom)